Microsoft Project VBA: How to time your code
Posted: June 28, 2017 Filed under: Microsoft Project VBA, MS Project 2010, MS Project VBA, MSP VBA | Tags: Macro timing, time code, time macro, vba code timing Leave a commentOne of the most common questions I get is “How do you time your code?” There are many ways to time your code. Here I will go over some simple ways to time it.
The first way I will show you is to just get the start time and the end time. You can add this code to different part of your code to see how long each section, sub, or function took to run. This is pretty handy especially when you have very complex code.
For this example make sure you have your “Immediate” window open:
- Make sure you are in Visual Basic Editor (VBE) – CTRL + F11
- Navigate View > Immediate Window or CTRL + G
Using the code below and Debug.Print will print into your immediate window:
Option Explicit
Sub mySimpleTimer()
Debug.Print “mySimpleTimer Start: ” & Time
‘**********
‘ Insert your code here
‘**********
Debug.Print “mySimpleTimer Finish: ” & Time
End Sub
Results:
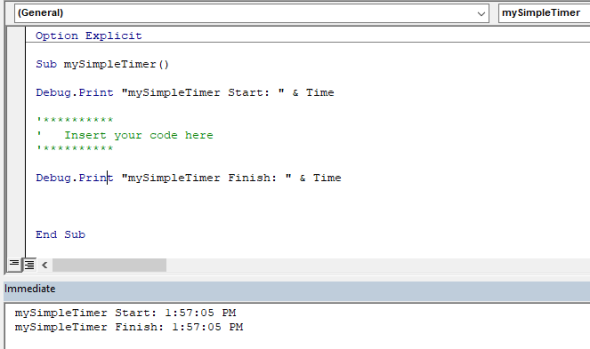
Since I don’t really have any code in there other than my timer, I get the same time for my start and my finish. With complex code you should see a difference between your start and finish times.
If you prefer to get a pop-up message you can easily modify this code to use a message box instead of the immediate window. Here is the code:
Option Explicit
Sub mySimpleTimerWindow()
MsgBox (“mySimpleTimer Start: ” & Time)
‘**********
‘ Insert your code here
‘**********
MsgBox (“mySimpleTimer Finish: ” & Time)
End Sub
Results:
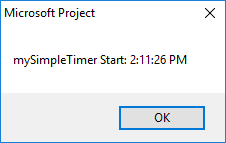
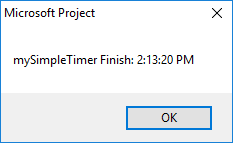
Yes, you get it twice. Once when you start the code and a second time when the code finishes. This might be exactly what you want. But maybe you would like to know the total time it took to run the code between start and finish time. Here is where the next code comes in.
Note: I will continue using the debug.print from here on out for demonstration purposes.
This code is a little more complicated. It gets you total number of seconds, minutes, and hours. You can easily add code to figure out number of days if needed, but is not part of this code.
I use the mod operator to find remainders.
Option Explicit
Sub calculateTime()
Dim startTime As Double
Dim finishTime As Double
Dim totalTime As Double
Dim totalSeconds As Double
Dim totalMinutes As Double
Dim totalHours As Double
startTime = Now()
‘**********
‘ Insert your code here
‘**********
finishTime = Now()
totalTime = finishTime – startTime
totalTime = totalTime / 60
If totalTime < 60 Then
totalSeconds = Round(totalTime)
ElseIf totalTime < 60 * 60 Then
totalMinutes = Round(totalTime / 60)
totalSeconds = totalTime Mod 60
Else
totalHours = Round(totalTime / 60 / 60)
totalMinutes = Round((totalTime / 60) – (totalHours * 60))
totalSeconds = totalTime Mod 60
End If
Debug.Print ” ————–“
Debug.Print “Hours: ” & totalHours
Debug.Print “Minutes: ” & totalMinutes
Debug.Print “Seconds: ” & totalSeconds
End Sub
Results:
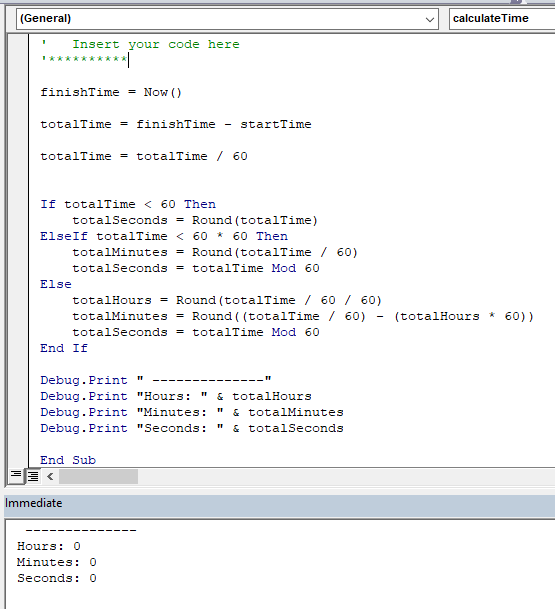
Since I am not really running any code other than timing the code goes really fast and doesn’t take any time at all (in seconds).
If I force total time to be say totalTime = 225000 milliseconds (which is what the computer calculates), the result is the following:
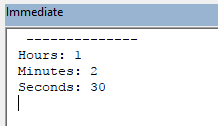
So let’s calculate it manually to see if the code is working:
totalHours = 225000 / 60 = 3750 seconds then
totalHours = 3750 / 60 = 62.5 minutes
That means that 225000 milliseconds is 1 hour (60 minutes) and 2.5 minutes (62.5 – 60). We can further break it down to 1 hour, 2 minutes, and 30 seconds (0.5 * 60). You might try to test it a few times to make sure that this code checks out for you.
I say we have been successful. Another fun day using VBA!
Microsoft Project VBA: Option Explicit vs Implicit
Posted: June 26, 2017 Filed under: Microsoft Project VBA, MS Project 2010, MS Project VBA, MSP VBA Leave a commentAfter coding quite a while in Microsoft Project using VBA I’ve noticed that many people don’t use Option Explicit at the top of the modules they are creating code in Microsoft Project. I see it more often used when I see Microsoft Excel code. It’s important to understand that using Option Explicit is beneficial when coding.
When writing VBA the default is to read variables implicitly. This means that if you want to create new variables you can create them on the fly without having to declare them. That sounds wonderful until you misspell your variable and VBA reads it as a new variable. Therefore, I find it more useful to declare in your code that you will explicitly declare each of your variables and if they are not explicitly declared, then you will automatically get an error.
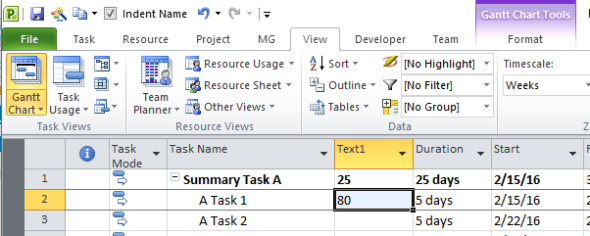
To better understand this issue let’s start by looking at some simple code. Say you have the following code with only one variable myNum. You find yourself typing really fast and misspell myNum and write mNum:
Sub explicitTest()
Dim myNum As Integer
myNum = 25
ActiveProject.Tasks(1).Text1 = myNum
mNum = 80
ActiveProject.Tasks(1).Text1 = mNum
End Sub
Result:
You run the code and there is nothing to tell you that now you have introduced a new variable without even knowing. What if you make the same mistake later in the code and try to use mNum and you get in return the wrong number? It becomes difficult to trace this type of error back to where it was introduced.
Here is where Option Explicit is very important. You try the same code but with Option Explicit at the top of the module.
Option Explicit
Sub explicitTest()
Dim myNum As Integer
myNum = 25
ActiveProject.Tasks(1).Text1 = myNum
mNum = 80
ActiveProject.Tasks(2).Text1 = mNum
End Sub
Result:
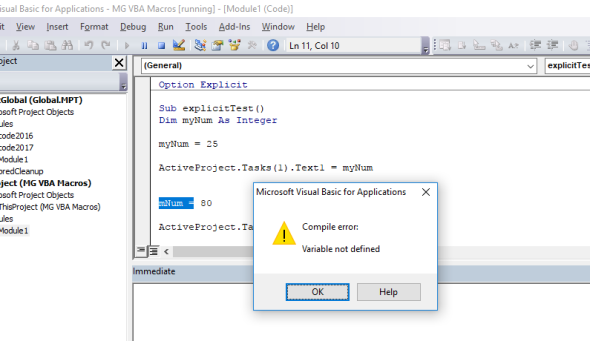
The error was caught as soon as the code was run. Since it wasn’t defined as a Dim you will get an error. This is good because you will avoid introducing potential bugs into your code that are hard to trace. If you did mean to introduce a new variable, then when getting this error you will know you need to go back and declare this new variable before continuing. This gives you greater control of everything happening within your code.
You can automatically add it to all your new code. Remember, this will NOT add it to your existing code, you will have to make sure to add it manually at the top.
To add it automatically to your code every time you are start new code you can do the following:
- Make sure you are in the Visual Basic Editor (VBE)
- Go to Tools > Options
- Once the Options pop-up window comes up check off the “Require Variable Declaration”

- Click Okay
There! you will not have to worry about adding this to all your new code.
Microsoft Project VBA: How to Store Your Code by Importing and Exporting Modules
Posted: June 21, 2017 Filed under: MS Project 2010, MS Project VBA, Program Management Leave a commentI frequently get questions on how I store my VBA code so I don’t accidentally lose it when the Microsoft Project client decides to quit on me. This is a good question since I have completely lost all my code in a project file and also while in the Global.MPT. So how do you protect you protect your precious code?
The best way I found that works for me is exporting my code to a folder on my desktop or a hard drive every time I make a change to my code. This means that some days I might make up to 15 copies of my code in an external folder so that I can always go back to see what changes I made along the way. So how is it done?
Understanding MS Project VBA Editor
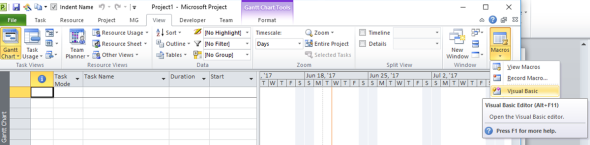
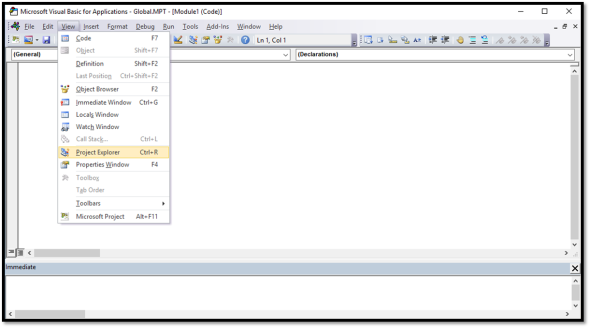
Before we start exporting data from the VBA Editor in MS Project, let’s explore where we can find this environment. One way to get to the VBA Editor from MS Project window is by clicking Alt + F11. Another way is to go to the View tab in your ribbon and click the upside down triangle on the Macros section. From there choose Visual Basic.
Visual Basic Editior (VBE)
Once you get to the Visual Basic Editor (VBE) you can start coding. I recommend you save your code all the time, especially before running it if you are constantly making changes. After a couple of lines of code, you might want to consider exporting your data to safeguard it outside of MS Project so no matter how many times it crashes you can always bring it back.
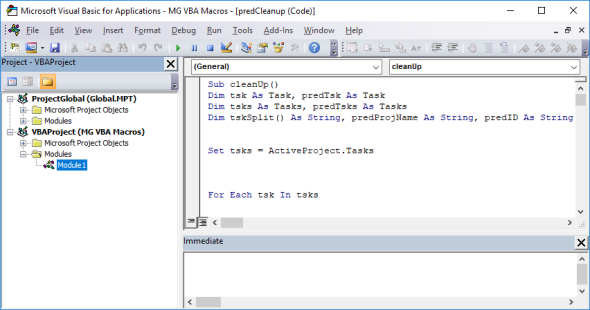
Let’s first take a look at the VBE. In there you will notice at least two main areas (three if you are connected to MS Project Server). Since on my personal laptop I don’t have access to MS Project Server, I only have two main areas. You can see these areas usually to the left top of your VBE. If you can’t see it go to your View menu and click on Project Explorer or do CTRL + R.
Once you can see your Project Explorer, then you will be able to see the two main areas in a tree structure.
The first main node is the Project Global (Global.MPT). The second main node will be your currently opened project. If you have more than one project file open, then you will see one node per project. The project file node is the one with VBAProject (<project file name>). Since I only have one project open I only see two main nodes. (For those of you with MS Project Server, the third main node or bottom node will be a Global Enterprise node. This is where all the code is kept for the whole enterprise/company).
Within each node you will find different types of sections for modules, class modules, and user forms as your project requires.
Exporting MS Project VBA
Now that we have identified the two main areas in the Project Explorer, now we are ready to export our code. I want to export Module1 from my opened project file.
- Navigate VBAProject(MG VBA Macros) > Modules > Module1
- Right-click on Module1 and choose Export File
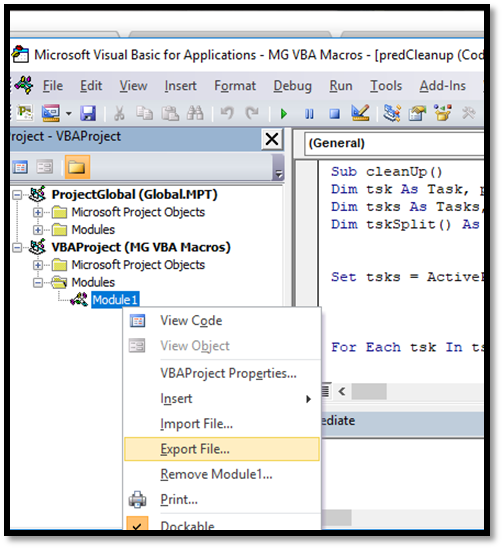
- Choose where you want to save your code and click Save. This will export your code as a .BAS extension file.
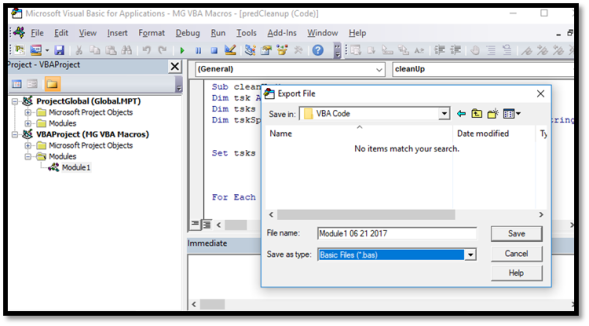
And that’s it! Your wonderful code is saved! Now if MS Project crashes or something weird happens you will have your code somewhere else.
What I love about having the code exported this way instead of highlighting it all and pasting to Notepad (or any other editor) is that the code is properly formatted. So when you try to imported back into MS Project it works perfectly. I sometimes have trouble with the code when I copy / paste directly to notepad… it can create errors once you try to paste it back into MS Project.
Importing MS Project VBA
So now you may be asking yourself, how do we import the code back in? Good question!
To demonstrate I deleted the previous Module1 from my project. Now I want to bring it back into my project by importing it.
- Right-click on VBAProject(<your project name>)
- Click on Import File
- Navigate to the folder where you keep your code
- Click on the file with your code and click Open
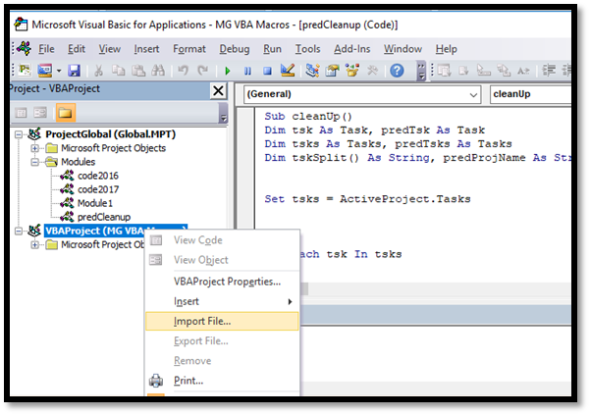
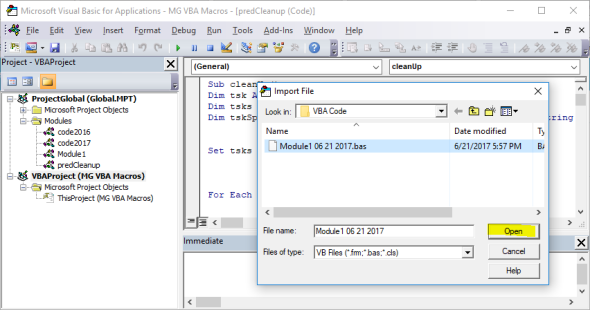
Then you are done! You have Exported and Imported your code in MS Project!
Until next time… 🙂
Looking to Recover your Global.MPT? You’re in good company….
Posted: May 4, 2017 Filed under: MS Project Custom Fields, MS Project Formatting, MS Project VBA, Program Management, Uncategorized Leave a commentWhen working with Microsoft Project (MSP), there is nothing more frustrating than losing the hard work you’ve put into a file whether it’s a schedule or VBA / Macros to work with your schedule.
Today I’m here writing about ways to try to recover your Global.MPT because I completely lost it today…. or so I thought. I was happily coding away building an awesome script in VBA and was feeling such success when this setback had me going from blissful to horrified in seconds. The code hung and I had to force MSP to close. Once I tried to open it back again and go to my code, it was all gone! The first thought that crossed my mind was, “Why didn’t I back it up?!?” followed by, “How could I have done such a rookie mistake?!?”
I then tried to calm down and try to troubleshoot and see if I had actually lost it all. The thing is, I keep a backup of all my code that I push to production from the development environment. The code that I build as helper functions such as adding text to the beginning or the end of a group of tasks quickly, this code I keep it in my .MPT file because I don’t want to keep it in the development environment and accidentally push it to production. I had built quite a few of this functions in the last couple of weeks, but hadn’t taken the time to back them up…. they are just little helper functions anyway, right? Hard lesson to learn was how important they are to me once I realized they were all gone….
A quick search online does not quickly give you ways to try to restore your Global.MPT file. I had to dig deep to actually find different methods to try. I will add the two that might give you results. Firstly, to find where in your computer you might find your Global.MPT, you can check out this article from Microsoft Support.
Once I found my Global.MPT on my computer at:
“C:/users/[your user name]/App data/Roaming/Microsoft/MS Project/1033”
I then immediately:
- Closed Microsoft Project completely
- Copied the Global.MPT file to a new folder
- Once I had a copy, I went back to the above address and renamade the file and changed the extension of the file to .MPP
- Then I opened the newly renamed file in step 3 with Microsoft Project
- The organizer pops up, then choose the Modules tab and copy all the “lost” modules to your new MPT file
- Make sure to reset any references in your library you were using for your macros if any
Of course, this doesn’t work for everyone. If you are one of the unlucky ones, I have one more trick up my sleeve. I found this solution when I was ready to give up on recuperating my awesome code. I had already started to mourn the loss of such great work…
- Go to C:\Users\[Your User Name]\AppData\Local\Temp
- Filter by Date
- Scroll down until you find your latest, mine was: “AutoRecovery Save of Global (183).MPT
- I immediately made a copy before I attempted to open.
- Once I had the backup, I renamed the file and changed the extension to .MPP
- I opened it and the Organizer was immediately launched.
- I copied over my code from the Modules tab to my new file.
I cannot tell you the immense relief I felt once I figured I hadn’t lost it all. I can recreate the few lines I did lose, but those helper functions are life (and time) savers for sure!
The moral of the story for both you and I is to make sure to create backups of ALL your code. Even code that you might not think is very important. It’s better to have it and not need it, than to need it and not have it.
Some ideas to save your code would be first of all NOT keep the code in Global.MPT. Even if you do, make sure to save your code in an actual .MPP file and create backups of that. Also, you can export your modules as .bas files or .frm for forms to a folder on your desktop. I’ve actually created code that exports all of them quickly. That’s one of the sub routines I had thought lost forever! That would have been a shame to lose….
Anyway, good luck recuperating your Global.MPT file…. know that you are in good company!
Microsoft Project VBA: How to open a project file from Excel
Posted: February 14, 2016 Filed under: Uncategorized Leave a commentRecently I’ve been playing around on how to open a Microsoft Project file from Excel using macros / VBA scripts. I’m currently using MS Project 2010 and MS Excel 2010. This script should work at minimum for MS Project 2010 / 2013. If you need it for earlier version, it should be similar, so play around with the code.
You can build a procedure Sub in your VBA Editor after you add a new Module to your current workbook.

Before starting to write your code, make sure you have the right references to access Microsoft Project! Click on Tools>References>Microsoft Project xx.x Object Library. Then click okay.

Now you are ready to start coding in MS Excel to access information from MS Project! Let’s start by opening an MS Project file from MS Excel.
Make sure to first set up your variables, which in this script you only need one. You will need one variable for your MS Project application, which I called projApp.
I use the On Error Resume next in case MS Project is not installed and an error occurs. This way the code stops running and you don’t get an error. We set projApp to be a new instance of object type. This means we can now access everything we need in MS Project.
NOTE: Every time you run a new Macro / VBA script you run a risk of losing all your work. When trying out new code I recommend you use it on copies of your projects and not on active projects. This way if your VBA doesn’t run correctly, you won’t lose valuable information. Run it at your own risk!
 Sub OpenProject()

 Dim projApp As MSProject.Application
'Excel Set up to access MS Project

On Error Resume Next

Set projApp = GetObject(, "MSProject.Application")

If projApp Is Nothing Then

Set projApp = New MSProject.Application

End If

projApp.Visible = True
'Open MS Project file

projApp.Application.FileOpenEx "C:\<>\My Example Project.mpp"
Set projApp = projApp.ActiveProject
'Final set up of code

Set projApp = Nothing
End Sub
Where you see “C:\<>\My Example Project.mpp”, this is where you put the information on where YOUR file is located. I took out most of my file path to not make it confusing

The last comment I want to make is that about the MS Project file you might be trying to open. I have found that if your MS Project file has macros, then you might have trouble using this macro because of Microsoft built in security. You might have to change the security settings so that your macro can work.
Otherwise, it works like a charm!
MS Project 2010 VBA: Uppercase or Lowercase
Posted: February 10, 2016 Filed under: MS Project 2010, MS Project Custom Fields, MS Project VBA, Program Management Leave a commentToday we are going to try our first VBA script on MAD Schedules! I promise I’ll try to keep it as simple as possible so you can follow easily. I assume you have the VBA Editor open and have a module ready for code. If not, then go back to my post on How to Start with VBA in MS Project 2010.
Okay, let’s start! I assume you have a schedule with some information. Here is an example of a schedule I built:

I have a custom field in text1 called “Contract#”. All the text in text1 is in lower case letters, but what if I want them to all be in upper case letters? It would take me about 10 or 15 minutes to fix each one at a time… but what if I had 1000 lines? That would take me quite some time! Especially if I had different Contract numbers and couldn’t just fix it quickly. That’s where the beauty of VBA comes in for our MS Project schedules! I go to my VBA Editor with my blank module such as here:

In the editor you can type:
Sub UpperCase()

 Dim tskTask As Task
For Each tskTask In ActiveProject.Tasks

tskTask.Text1 = UCase(tskTask.Text1)

Next tskTask
End Sub
This code can be used for any text field in Microsoft Project. Just change out Text1 in the code for whatever field you need to change to Uppercase.
How to run your new VBA Script
Now you are wondering, how do I test this script? First of all, make sure you are testing code on a copy of a schedule. Do NOT test on a current file! Once the changes are done with a script, there is NO undo button! So proceed with caution…
There are a couple of ways you can access and use your new script. I will touch on one way today. Go to your project file and click on the Developer tab. Then click on View Macros.

Make sure you are viewing macros only for your current project and choose Uppercase macro. Then click on Run.

As you can see it worked! My “project 001” text was all changed to “PROJECT 001”.

How to change to Lowercase Letters
To change your text to lowercase letters you add a new module to your VBA Editor. If you try to use the same module as for the Uppercase script, there is potential for errors to be generated because I’m using the same variable for both scripts.
Type in the new module:
Sub LowerCase()

 Dim tskTask As Task
For Each tskTask In ActiveProject.Tasks

tskTask.Text1 = LCase(tskTask.Text1)

Next tskTask
End Sub
To run it, go back to your project file Developer > View Macros > Lowercase > Run. That should do it!
Now that you have a little practice with VBA Script, you can keep modifying this code to do other things in MS Project!
MS Project 2010 Custom Gantt: Add dates to the bars
Posted: February 8, 2016 Filed under: MS Project 2010, MS Project Formatting, MS Project Gantt Formatting, Program Management Leave a commentThe project team has decided they want to see dates on their Gantt chart bars. So how do you do? Easy! Here are the steps you take to change your Gantt in MS Project. It is similarly done MS Project 2013, which I also used daily. Here is a schedule with no dates on the bar chart.

To put dates on the Gantt we can start by adding them to the right side of the bars.
First right click on the Gantt > Bar Styles and make sure you have “Task” highlighted. On the bottom section click on Text tab. Once there next “Right” type Finish and click OK.

Once you click OK you will see the dates on the right of the bars:

If you want to take out the lines and arrows to have a a cleaner looking bar chart, you can right click on gantt > Layout and make sure under Links change it to no arrows (first option). Here you can also change the date format in your bar chart under Date Format.

Below you can see the changes I made to my Tasks and Milestones, plus I took off the lines and arrows. I’m ready to submit my Gantt chart for a schedule presentation. Look how pretty it looks….

Just by playing around with the settings in the two areas I pointed out today, you can change the settings on how your bar chart looks. Hope that helps you on your journey of learning how to format in MS Project.
How to Start With VBA in MS Project 2010
Posted: February 8, 2016 Filed under: MS Project 2010, MS Project VBA Leave a commentTo start scripting in Microsoft Project with Visual Basic for Applications (VBA) you can either start recording a Macro, or work in the VBA Editor. Here I’m going to show you how to get to your VBA editor. I’m using MS Project 2010, but it is very similar in MS Project 2013.
So let’s start:
Go to File > Options

In Options click on Custom Ribbon. Once you are in Custom Ribbon make sure that you have Developer checked on the right pane under Main Tabs Options > Custom Ribbon > Main Tabs > Developer . Then click OK.

Once you have clicked okay, you should be able to see the Developer tab on your Microsoft Project ribbon:

Now that you can access the Developer tab, you can click on the Visual Basic icon to get to the Visual Basic Editor.
To start writing VBA code, you will have to right click on modules and choose to add a module Modules > Insert > Module. Now you are ready to start your first VBA script. Have fun! 🙂
Plan of Action for PMI-SP Exam
Posted: February 6, 2016 Filed under: PMI-SP, Program Management Leave a commentI have finally decided to come back to writing here… it seems I haven’t written for about a year. The good news is I was away because I was really busy with work and life. I have acquired so much more experience in such a short year! I have done about 40 proposal schedules for different programs, ranging from programs worth a couple $100k USD to a multi-billion dollar program. I’ve also handled about 15 schedules in execution mode at my highest point… that sure was exhausting! While I was doing all that, I was also helping out other schedulers build custom formulas and VBA scripts to streamline the statusing phase of their programs. It has become of vital importance for me to be up to speed on cost and schedule integration using MS Project Server. This next year promises to be interesting! I hope I learn more and expand my skills in different directions…
Speaking of which, I have decided to try to get my PMI-SP certification this year. I don’t know how feasible it is since I’m so busy, but it won’t happen if I don’t at least try, right? Since I’m a planner in and outside of work, I have already laid out a plan to achieve this goal. Would you like to hear about it?
For those of you who don’t know what PMI-SP certification, I will explain it a little here. You can find more information at Project Management Institute (PMI) Scheduling Professional about page. The PMI-SP certification is very similar to the Project Management Professional (PMP) certification, but specializes on the scheduling aspect of project management. To be even allowed to take the test you need:
- Advanced knowledge and experience developing, managing and maintaining project schedules
- High school diploma or Associate degree holders need:
- 5,000 hours of project scheduling experience
- 40 hours of project scheduling education
- 4 year degree holders need:
- 3,500 hours of project scheduling experience
- 35 hours of project scheduling education
I totally exceed these requirements, so I went ahead and applied. I waited 5 LONG work days to find out they had accepted my application and now I can pay and schedule my test date… The problem is that I’m not sure I’m ready to take the test yet. The good thing is that I can take the test up to three times in a one year period before I have to re-apply. All I have to say is that the test is EXTREMELY expensive, to me anyway, and I want to try my best to pass it the first time. Wouldn’t you feel the same?
- $520 member (subject to change)
- $670 non-member (subject to change)
I quickly became a member because then you can see their Practice Standards and Frameworks for free.
So what’s my plan to study for the PMI-SP certification? First I have started reading these documents/books:
- Practice Standard for Scheduling
- Practice Standard for Earned Value Management – Second Edition
- Practice Standard for Work Breakdown Structures—Second Edition (Reaffirmed)
- PMBOK® Guide & Standards
- Dynamic Scheduling® With Microsoft® Project 2013: The Book By and For Professionals by Rodolfo Ambriz and Mario Landa
I’m also going to look all over the internet to see if I can find practice questions for free or low cost. As I try these questions I’ll go back to the resources above and see how everything aligns.
If you’ve taken this test in the past, what have you done to prepare?
MS Project Formula: Custom Field for Checking Logic
Posted: February 11, 2015 Filed under: MS Project Custom Fields, MS Project Formulas | Tags: MS Project, MS Project Custom Field, MS Project Formula, MS Project Graphical Indicator Leave a commentA custom field that I use constantly when building project schedules is for checking if the task is missing either a predecessor or successor. I call this field Logic, and I find it handy because the last thing you want on your hands is a project schedule with spaghetti logic. The best practice for network logic is that every task has a predecessor or successor, except for the first task or the last task. Of course, each project has it’s own quirks and you might find this doesn’t make sense. That will have to be something you need to decide whether to not follow this, but make sure you clearly document it in your project plan assumptions.
Define Custom Field: Logic
The first thing to do is to create a custom field named Logic. I will build it using Flag1.
Step 1 – Highlight your first column by clicking on the title name of your column.
Step 2 – Right-click and choose Insert Column.
 Step 3 – Scroll down or start typing Flag1. Choose Flag1. Once the Flag1 column is in your Gantt Chart view highlight the whole column and right-click.

Step 4 – Rename Custom Field. Make sure you have Flag1 chosen. Then click on Rename, change the name from flag1 to Logic, finally click OK.

Now we have created the field Logic. Don’t close the Custom Fields menu yet. Now we are going to build the formula to show us where we are mission a predecessor or successor (or both). Then we will add a graphical indicator to quickly spot our missing logic.
Step 5 – Click on the Formula button in the Custom Fields menu. Type in the following formula in the Edit Formula box.
IIf(([Predecessors]="" Or [Successors]=""),True,False)
Here is the project image below

Don’t close your Custom Fields menu yet! The last part is to put a graphical indicator (image). It’s easier to spot this way instead of seeing yes and no all over the column.
Step 6 – Click on Graphical Indicators… button towards the bottom of the Custom Fields menu. In the test for logic field type equals, in values enter True, and in image choose the image that you best like. Then click OK, and OK again. You are done.

If all is working correctly you should see where you might be missing logic on your Logic column shown with an image in each row that has missing logic.

That should do it! You now can quickly see where you need predecessors or successors. You can customize it into two different custom fields if you want to check one or the other. Have fun building custom formulas!
